
Tomahawk Targets
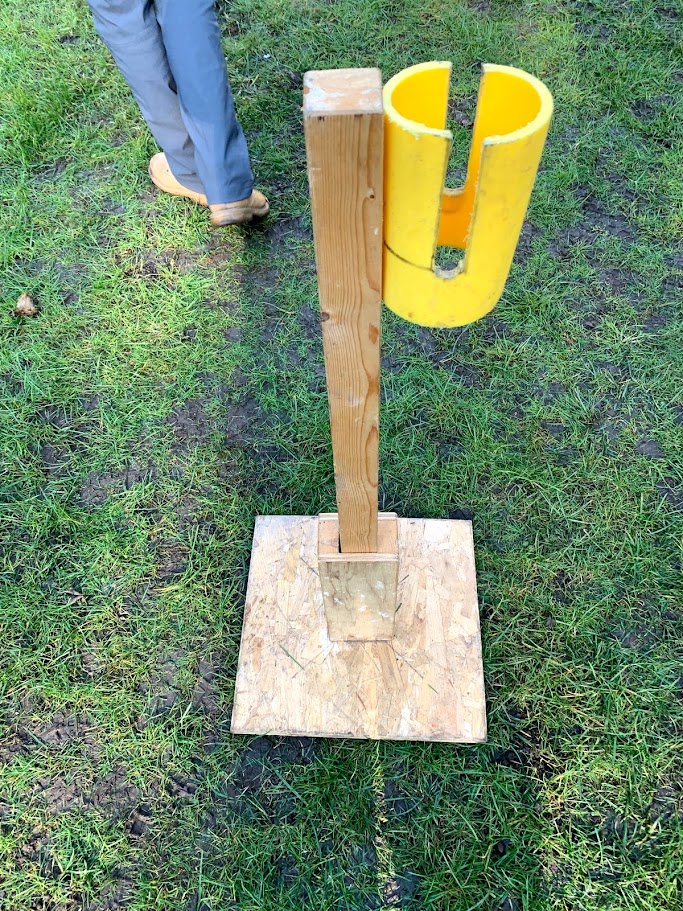
Tomahawk Holder – Construction Instructions
1. Purpose
This holder is designed to safely hold tomahawks between use, keeping the heads contained and the handles supported. It should be placed on a stable, level surface.
2. Main Components
A. Head Block
- 150 × 100 × 50 mm
B. Upright Post
- 600 × 50 × 50 mm
C. Base Plate
- 400 × 400 × 18 mm
D. Handle Brackets
- 2 × 50 × 50 × 100 mm
E. Handle Retainers
- 2 × approximately 300 Black Wast Pipe
- Hardwood dowel or suitable round timber
F. Gussets
- 4 rectangler timber gussets, approximately 80 mm sides
G. Fixings
- Suitable structural bolts, washers and nuts
- Exterior-grade wood screws
- Wood adhesive where appropriate
3. Construction
Step 1 – Make the head block
Cut the head block to approximately 150 × 100 × 50 mm.
Cut a central slot from the top to accommodate the tomahawk head.
The slot should be sized for the particular tomahawks being used, leaving enough timber around the slot to maintain strength.
Do not make the slot unnecessarily wide.
Step 2 – Prepare the upright
Cut the upright to approximately 600 × 50 × 50 mm.
Create the required mounting arrangement at the bottom so the upright can be securely fixed to the base.
Step 3 – Attach the head block
Position the head block centrally on top of the upright.
Secure it using suitable bolts passing through the head block and upright.
Use washers to spread the load and prevent the timber from being crushed.
Step 4 – Prepare the base
Cut the base plate to approximately 400 × 400 × 18 mm.
Position the upright centrally on the base.
Secure it firmly using structural screws or bolts.
Step 5 – Add gussets
Fit a rectangler gusset to each side of the upright.
The gussets help prevent the upright from flexing or rocking.
Secure them to each other and base plate.
Step 6 – Fit the handle supports
Fit one tomahawk handle support to each side of the upright, approximately top of base.
The supports should hold the tomahawk handles vertically without allowing them to fall sideways.
Step 7 – Fit the handle retainers
Insert the round timber/dowel through the handle brackets.
Fit suitable end stops, washers or caps so the retainers cannot slide out during normal handling.
The retaining arrangement should allow the tomahawks to be inserted and removed easily.
Step 8 – Final finishing
- Sand all exposed edges.
- Remove sharp corners and splinters.
- Apply suitable exterior paint, preservative or protective coating.
- Allow coatings and adhesive to fully cure before use.

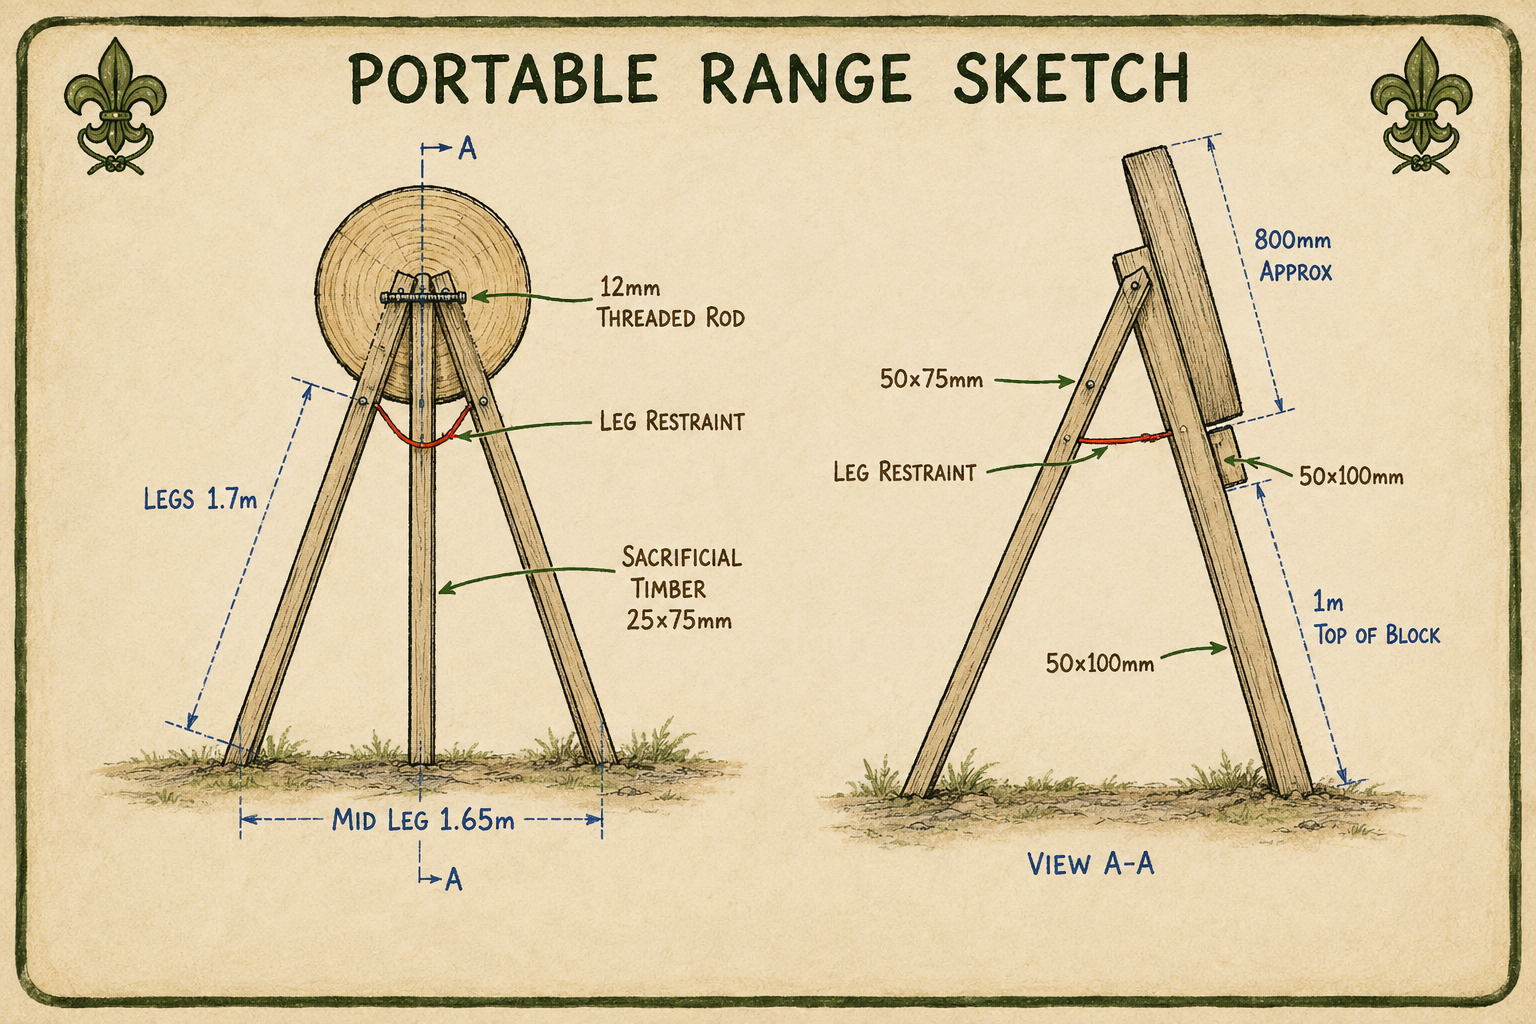
Portable Target Construction
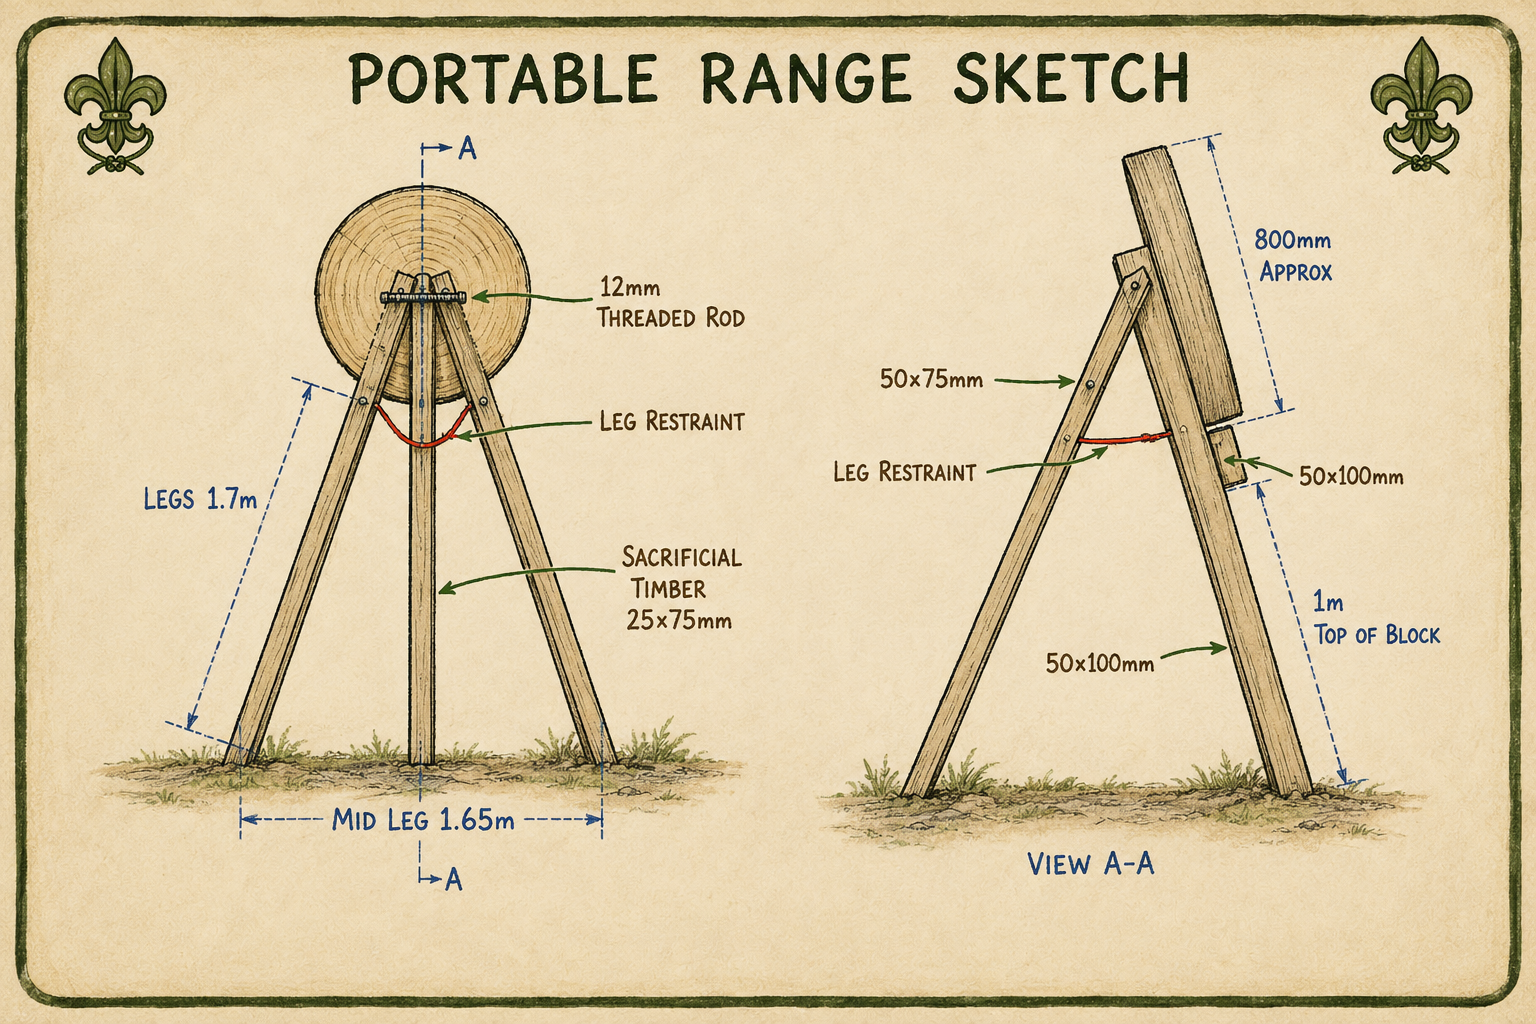
Portable Tomahawk Range – Construction Instructions
The portable range can be made as a folding A-frame, allowing it to be transported and assembled at different activity locations.
Materials
- 2 × main legs — approximately 1.7 m
- 1 × centre sacrificial timber — approximately 1.65 m
- 1 × 12 mm threaded rod with washers and nuts
- 1 × leg restraint — approximately 50 × 100 mm
- 2 × rear brace/support pieces — approximately 50 × 75 mm
- 2 × rear block supports — approximately 50 × 100 mm
- Suitable exterior-grade screws/bolts
- Target/backstop timber as required
Assembly
- Lay out the components
Check all timber for splits, rot or other damage before assembly. - Form the A-frame
Stand the two 1.7 m legs together to form an A. Position the feet approximately 1.65 m apart, as indicated by the sketch. - Fit the centre timber
Position the 25 × 75 mm sacrificial timber centrally between the legs. - Fit the top threaded rod
Drill the appropriate holes through the legs and centre timber. Pass the 12 mm threaded rod through and secure it with washers and nuts. Tighten sufficiently to hold the frame securely without crushing the timber. - Fit the leg restraint
Install the restraint between the two legs. This prevents the legs spreading beyond the intended position. - Fit the rear supports
Attach the 50 × 75 mm braces and 50 × 100 mm supports shown on the side-view drawing. These provide additional support for the target/backstop assembly. - Fit the target/backstop
Attach the target material securely to the supporting structure. Make sure the fixing system allows damaged target material to be replaced. - Final stability check
Place the range on firm, level ground. Fully open the legs and check that it does not rock, twist or move.
Before every use
☐ Check all bolts, nuts and screws
☐ Check the leg restraint
☐ Check the timber for splits or damage
☐ Check the target/backstop is secure
☐ Check the range is stable and correctly positioned
☐ Check the throwing area and safety zone are clear
☐ Do not use the range if any structural component is damaged
Important: The dimensions in the sketch are a construction guide, not certified structural calculations. The completed range should be assessed for the actual target system, site conditions and intended use before being put into service.
Permanent Targets Construction
Permanent Tomahawk Range – Construction Instructions
1. Select and prepare the site
- Choose a level, stable area with good drainage.
- The range should have a clearly defined throwing line and a controlled area behind and around the targets.
- Keep the range away from public access, paths and other activities.
- Provide a suitable safety zone and clear signage around the range.
- Check the proposed location with the site owner and follow your organisation's activity and safety requirements.
2. Materials
Based on the supplied sketch:
- Posts: 100 × 100 mm — 4 × 4 m
- Fascias: 32 × 150 mm — 4 × 3.5 m
- Support rails: 50 × 100 mm — 4 × 2 m
- Slot battens: 50 × 50 mm — 6 × 2 m
- Scaffold boards: approximately 24 × 2 m
- Concrete for post foundations
- Suitable exterior-rated fixings
All timber should be suitable for outdoor use and inspected for defects before construction.
3. Install the posts
- Mark out the range with approximately 2 m bays as shown on the drawing.
- Excavate the post foundations to approximately 600 mm deep, subject to ground conditions and engineering requirements.
- Position the 100 × 100 mm posts vertically.
- Temporarily brace the posts while the concrete is placed.
- Check every post for vertical alignment and ensure the faces are in the same plane.
- Allow the concrete to fully cure before loading the structure.
4. Install the support rails
Fit the 50 × 100 mm support rails horizontally between the main posts.
The rails provide the supporting framework for the rear target boards. Fix them securely to the posts using appropriate structural outdoor fixings.
Check that the rails remain level and that there are no protruding fixings that could create a hazard.
5. Fit the scaffold boards
Install the scaffold boards horizontally across the bays.
- Boards should sit securely against the support structure.
- Minimise gaps between boards.
- Replace any split, rotten or badly damaged boards.
- Do not use boards with defects that could compromise the backstop.
The drawing indicates approximately 1,600 mm of main board height, with an additional upper section shown at approximately 600 mm.
6. Fit the fascias and slot battens
Install the 32 × 150 mm fascias and 50 × 50 mm slot battens as shown in the drawing.
These should provide a neat, secure finish and help retain the target/backstop construction.
All fixings should be checked so that there are no sharp or projecting components on the range-facing side.
7. Target mounting
Targets should be mounted securely to the designated target/backstop area.
The target mounting arrangement should allow damaged target material to be replaced without compromising the main structure.
Do not rely on the timber backstop alone as a substitute for a properly assessed safety system.
8. Final inspection
Before the range is put into service:
- Check all posts are secure.
- Check foundations have fully cured.
- Check every structural fixing.
- Inspect all timber for cracks, splits and rot.
- Check that boards are firmly supported.
- Check that no bolts, screws or brackets present a hazard.
- Check the target mounting system.
- Confirm the throwing line and safety boundaries are clearly marked.
- Check that the surrounding area is clear of people and unrelated activities.
9. Ongoing inspection
A permanent range should be inspected before use and periodically thereafter, particularly after bad weather or heavy use.
Record:
- Date of inspection
- Condition of posts and foundations
- Condition of backstop boards
- Condition of target fixings
- Structural damage
- Any repairs undertaken
- Person completing the inspection
Any structural damage or deterioration should result in the affected section being taken out of service until it has been made safe.
Important
The dimensions in the supplied sketch should be treated as a construction concept rather than certified structural drawings. Before constructing a permanent installation, have the design checked against the actual site, ground conditions, expected use and your organisation's safety requirements. A competent person should approve the finished structure before it is used for activities.
Other Target Types
End Grain Target
An end-grain target is a wooden throwing target made from blocks or sections of timber arranged so that the end of the wood grain faces the person throwing.
Instead of throwing into the side of a plank, you are throwing into the ends of the timber fibres. The target in your photograph is a good example: it is made from individual blocks fitted together inside a timber frame.
Advantages of an end-grain target
- Better blade penetration – the blade cuts between the wood fibres rather than striking across them, making it easier for a suitable tomahawk or throwing axe to stick.
- Good holding power – when the wood is suitable and in good condition, the fibres grip the blade well.
- Replaceable sections – damaged or heavily used blocks can be replaced individually rather than replacing the whole target.
- Longer target life – the target can often be rotated or individual sections replaced to spread wear.
- Good for repeated use – particularly useful on training and activity ranges where the same target receives many throws.
- Easy to inspect – cracks, splits, rot and excessive damage can be identified on individual blocks.
- Suitable for different target layouts – the face can be left plain or marked with scoring rings.
One important consideration
The type and condition of the timber are critical. An end-grain target isn't automatically safe simply because it is end grain. Timber that is too hard, too soft, rotten, split, excessively dry, or badly damaged can affect how the tomahawk behaves.
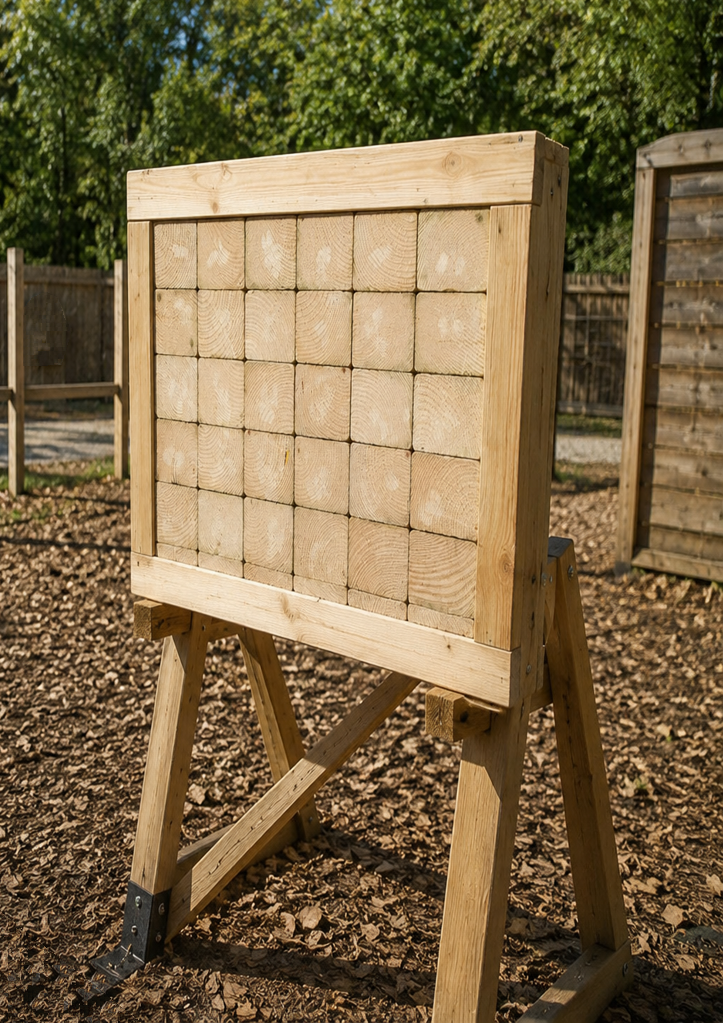
Vertical Grain Target
A vertical grain target is made from timber boards positioned so that the wood grain runs vertically from the top to the bottom of the target face. This is a common style of target for tomahawk throwing and is particularly useful for training and activity ranges.
The tomahawk is thrown into the face of the timber, allowing the blade to penetrate between the wood fibres and grip the target.
Advantages of a Vertical Grain Target
- Good blade penetration – the grain direction allows the tomahawk blade to cut into the timber and stick.
- Consistent throwing surface – when suitable timber is selected, the target provides a relatively predictable surface for beginners and experienced throwers.
- Simple construction – targets can be constructed from readily available timber boards and a supporting frame.
- Easy to maintain – individual boards can be replaced when they become excessively damaged or worn.
- Long service life – rotating or replacing boards can help spread wear across the target.
- Clear scoring area – concentric rings can be added to provide a simple scoring system for training and competitions.
- Suitable for training ranges – the straightforward design makes it practical for Scout, activity and recreational throwing ranges.

Types of Wood For Target Rounds

Target Rounds - What wood do i use?
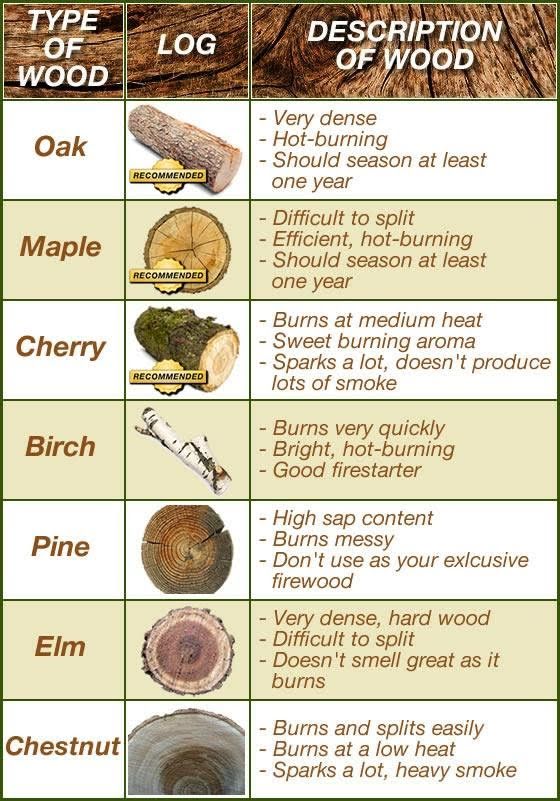
For axe or tomahawk throwing target rounds, use softwood rounds that allow the blade to stick without damaging the edge.
Good choices include poplar, willow, pine, spruce, or cedar. Poplar and willow are particularly good because they are relatively soft and forgiving.
Avoid very hard woods such as oak, beech, or ash, as these can make it harder for the axe to stick and may cause more wear to the blade.
A target round should ideally be at least 10–15 cm (4–6 inches) thick, securely mounted, and replaced when badly split or damaged.
Soaking a Tomahawk Target
Water can temporarily soften the wood fibres, making a dry or hard timber target easier for a tomahawk to penetrate and stick.
Advantages:
- Helps improve blade penetration.
- Can make a dry target more forgiving.
- Reduces the chance of repeated throws simply bouncing out.
- Particularly useful when timber has become very dry during hot weather.
How it works
The water penetrates the wood fibres and makes them more flexible. When the tomahawk strikes the target, the fibres can compress and separate around the blade rather than resisting penetration as strongly.
Tomahawk Targets FAQs
What makes a good tomahawk throwing target?
A good target should be made from suitable timber that allows the tomahawk to penetrate and stick consistently. It should be securely mounted, stable and regularly inspected for splits, rot and excessive damage.
What type of wood is best for tomahawk targets?
Suitable softwoods such as poplar, willow, pine, spruce and cedar can work well for tomahawk targets. Softer timber generally provides better penetration and is more forgiving than very hard woods.
Can I use oak for a tomahawk target?
Oak is generally too hard for an ideal throwing target. Hard timber can make it more difficult for the tomahawk to stick and may result in additional wear to the blade.
What is an end-grain target?
An end-grain target is made from sections of timber arranged so that the ends of the wood fibres face the thrower. This allows the tomahawk blade to cut between the fibres and can provide good penetration and holding power.
What is a vertical-grain target
A vertical-grain target uses timber boards positioned with the grain running vertically from the top to the bottom of the target. The tomahawk is thrown into the face of the boards, allowing the blade to penetrate the wood fibre
Which is better: end grain or vertical grain?
Both can make effective targets when properly constructed and maintained. The choice depends on the available timber, construction method, expected use and how the target will be maintained.
How thick should a tomahawk target be?
The required thickness depends on the timber, target design and equipment being used 100mm plus. Target rounds should generally provide sufficient depth for the tomahawk to penetrate securely without passing through the target or spltting 150mm plus are ideal.
How large should a target be?
The target should be large enough for the activity being provided and appropriate for the throwing distance and participants. A larger training area can be useful for beginners, while scoring targets can be marked according to the activity.
Does a tomahawk target need to be mounted securely?
Yes. A target must be stable and securely supported so that it cannot move, fall or become displaced when struck. The supporting structure should also be inspected regularly.
How often should a tomahawk target be inspected?
Targets should be checked before use and regularly during periods of heavy use. Look for cracks, splits, rot, excessive damage and areas where the timber is no longer providing a suitable throwing surface.
When should a target be replaced?
Replace target timber when it becomes badly split, rotten, excessively damaged or otherwise unsuitable for continued use. Do not continue using a target simply because there are still areas that appear usable.
Can a damaged section of an end-grain target be replaced?
One advantage of an end-grain target is that individual sections can often be replaced. This can extend the useful life of the target while maintaining a suitable throwing surface.
Can a target be rotated to extend its life?
Some target designs allow sections or target rounds to be rotated so that wear is distributed across different areas. Only do this where the target has been designed to allow it safely.
Should a dry tomahawk target be soaked in water?
Water can temporarily soften dry timber and may improve penetration. However, soaking should not be regarded as a substitute for choosing suitable timber or replacing a target that has become unsuitable.
Why does soaking a target make tomahawks stick better?
Water can temporarily make the wood fibres more flexible. This can allow the fibres to compress and separate around the blade more readily when the tomahawk strikes the target.
Can any target be made suitable by soaking it?
No. Soaking does not make unsuitable, rotten, split or excessively hard timber into a suitable target. The underlying timber and condition of the target remain important.
What is a target backstop?
A backstop is part of the range structure designed to provide additional protection behind or around the target area. It should be properly designed, securely constructed and assessed for its intended use.
Can I build my own tomahawk target?
A target or range can be constructed for an activity, but it needs to be properly designed, securely built and assessed before use. Construction dimensions should not automatically be treated as certified structural specifications.
What should I check on a portable tomahawk range?
Before use, check the frame, bolts, nuts, screws, braces and restraints. Inspect the timber for splits or damage and make sure the target and backstop are secure. The complete range should stand firmly on level ground without rocking or moving.
What should I check on a permanent tomahawk range?
Check the posts, foundations, structural fixings, support rails, target boards and target mounting system. Also check the throwing line, safety boundaries and surrounding area before the range is used.
How should a permanent range be maintained?
A permanent range should be inspected regularly, particularly following bad weather or heavy use. Keep records of inspections, structural condition, damage and repairs, and take damaged sections out of service until they have been made safe.
Can I use old timber for a tomahawk target?
Old timber can sometimes be suitable, but its condition must be carefully assessed. Avoid timber that is rotten, badly split, excessively hard or otherwise unsuitable for repeated impact from tomahawks.
Why does my tomahawk bounce out of the target?
Several factors can contribute, including unsuitable timber, a damaged target surface, excessive dryness, the angle of the throw or an inconsistent throwing technique. Check the target condition before attempting to compensate by changing your throwing technique.
Is a target that allows the tomahawk to stick automatically safe?
No. A target must be considered as part of the complete throwing range. The target, supporting structure, backstop, throwing area and safety zone all need to be appropriate for the activity.
What is the most important thing to remember about tomahawk targets?
Use suitable timber, keep the target secure and inspect it regularly. If a target or its supporting structure becomes damaged or unstable, take it out of service until it has been properly repaired or replaced.
My Links
Scouing Links
Location: Essex